- 01 Prerequisites
- 02 Install Claude Code
- 03 Local AI Models (Ollama)
- 04 Create 4 iTerm2 profiles
- 05 Profile startup commands & directory
- 06 Shell snippet
- 07 Window layout & arrangement
- 08 Launch Claude Code
- 09 Keyboard shortcuts
- 10 iTerm2 triggers (optional)
- 11 Cross-pane workflow
- 12 Daily playbook
- 13 Adapt for other projects
- 14 Two-tier hook architecture
- 15 gate Workflow
- 16 SESSION_LOG pattern
- 17 CLAUDE.md split pattern
- 18 MCP server, slash commands & skills
- 19 Draw Things (optional)
- 20 Troubleshooting
- 21 Quick Reference
Prerequisites
Three tools to install before anything else. All three are Homebrew packages — if you already have them, each check-then-install is a single command.
Open iTerm2 once to complete initial setup, then continue in it for the rest of this guide.
Install Claude Code
Claude Code is Anthropic’s official CLI. Install it globally via npm, then authenticate. Browser OAuth is the recommended path — no API key required.
Pro or Max subscription required for browser OAuth. No API key needed with this method.
Local AI Models (Ollama)
Run AI models privately on your Mac — no API calls, no data leaving your machine. Install Ollama, pull the models for your RAM tier, then add the shell aliases.
| Tier | Models to pull | Disk / Time |
|---|---|---|
| 🌺 16 GB+ | qwen3:8b qwen3-coder:7b nomic-embed-text | ~10 GB / 15 min |
| 🔵 32 GB+ | qwen3:14b qwen3-coder:14b nomic-embed-text deepseek-r1:8b | ~23 GB / 40 min |
| 🔴 64 GB+ | qwen3:14b qwen3-coder:32b nomic-embed-text deepseek-r1:8b gemma3:27b | ~55 GB / 90 min |
Example (16 GB tier):
The Ollama block in zshrc-snippet.sh adds these aliases. Append the relevant tier block to your ~/.zshrc (see Step 6 for full snippet instructions).
| Alias | Model | Use for |
|---|---|---|
| llm-fast | qwen3:8b / :14b | General queries, summaries |
| llm-code | qwen3-coder:7b / :14b / :32b | Code generation & review |
| llm-reason | deepseek-r1:8b | 🔵 Structured reasoning (32 GB+) |
| llm-embed | nomic-embed-text | Embeddings / RAG |
| llm-smart | router | Auto-picks by task type |
This workflow relies on features the default Terminal doesn't have:
| Feature | macOS Terminal | iTerm2 |
|---|---|---|
| Split panes | Tabs/windows only — no side-by-side splits | Unlimited independent panes in a single tab |
| Named profiles | Basic profiles, no $ITERM_PROFILE env var | Auto-sets $ITERM_PROFILE per pane — the key to role detection |
| Visual identity | Basic themes and transparency | Per-profile backgrounds, tab colours, badges, and 24-bit colour |
| Window arrangements | No saved layouts | Save & auto-restore multi-pane layouts on launch |
| Productivity | Standard find and copy | Paste history, Instant Replay, triggers, shell integration |
The $ITERM_PROFILE environment variable is especially critical — it's what lets the cc alias automatically launch the right model and permissions per pane, and it survives window arrangement restores.
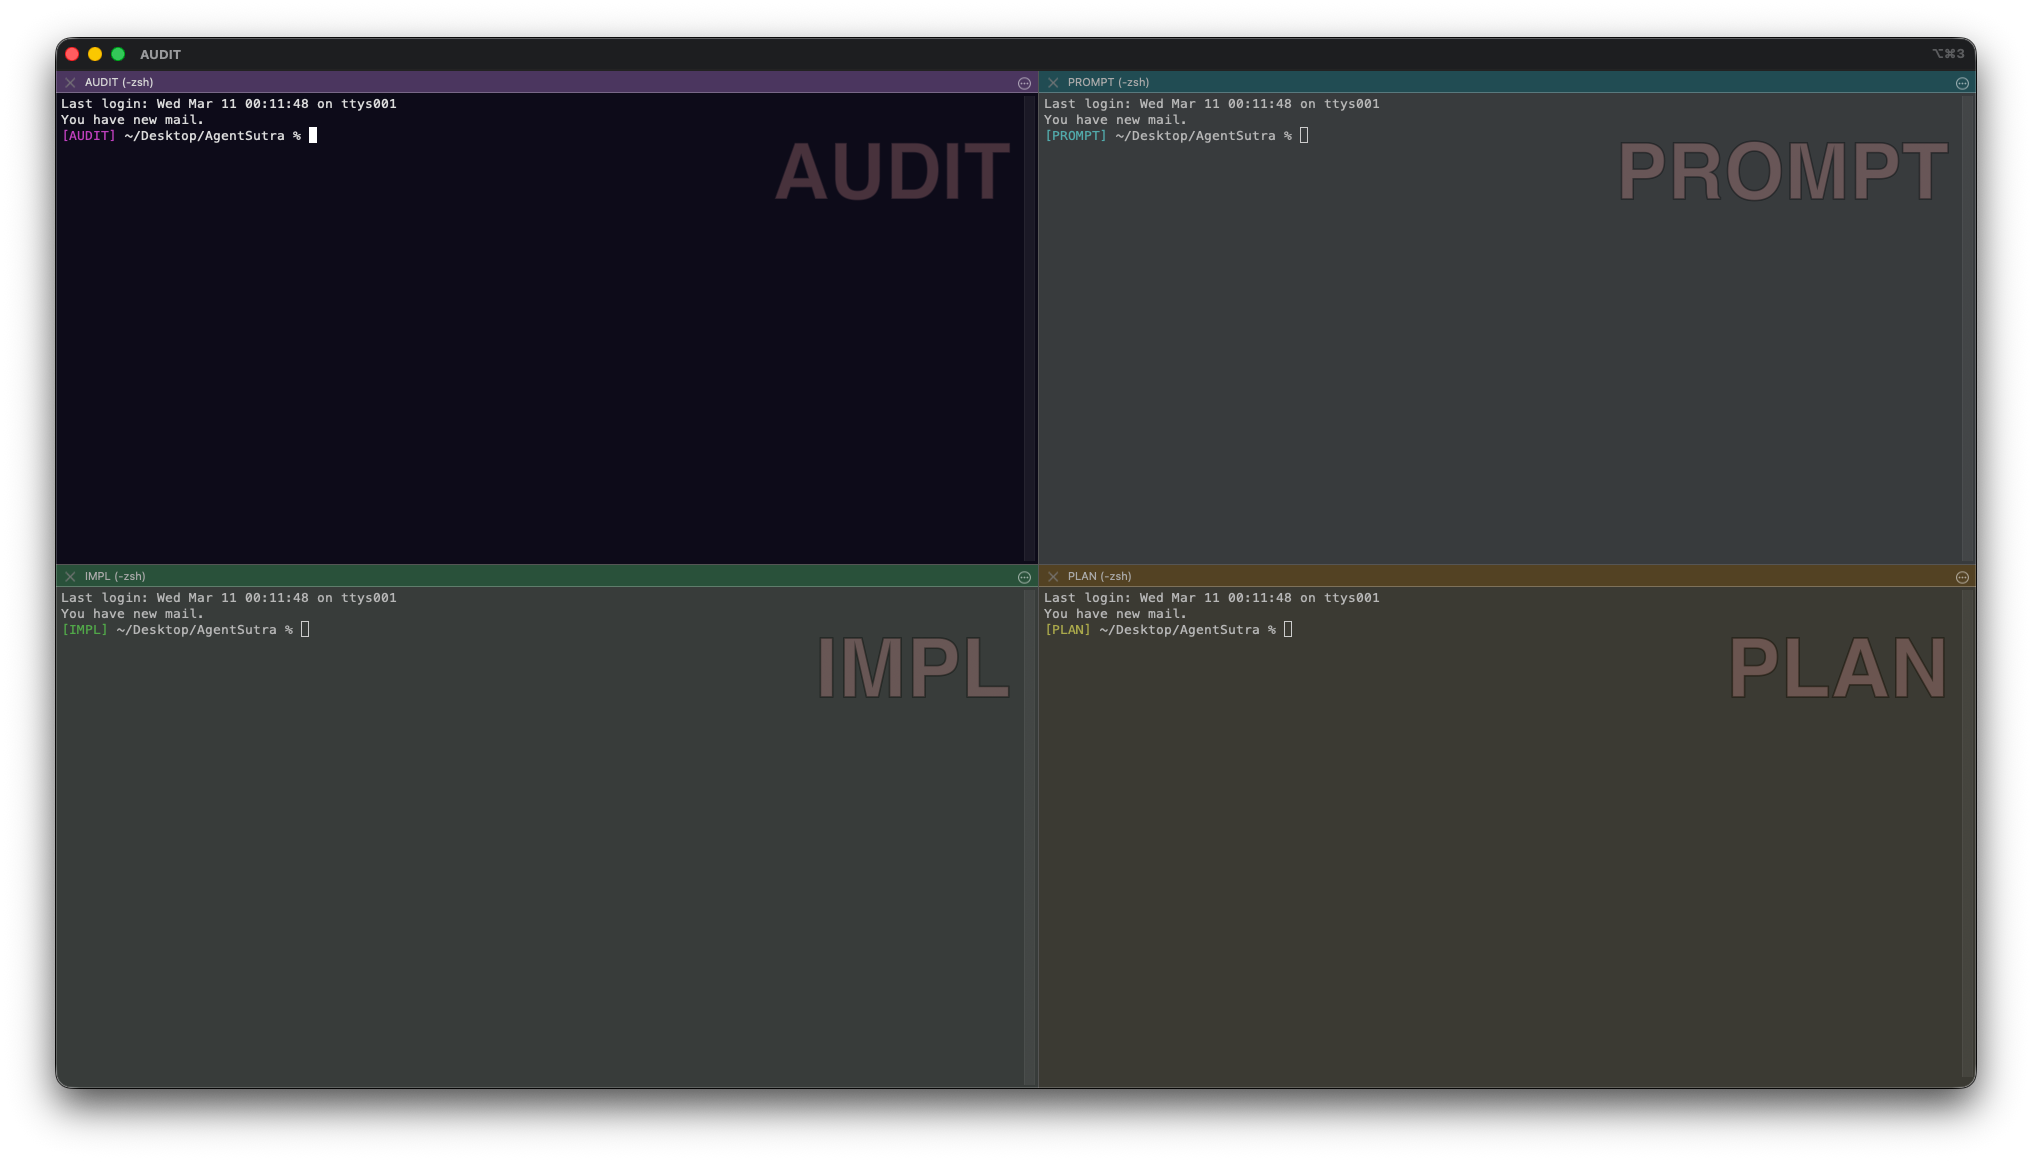
Create 4 iTerm2 Profiles
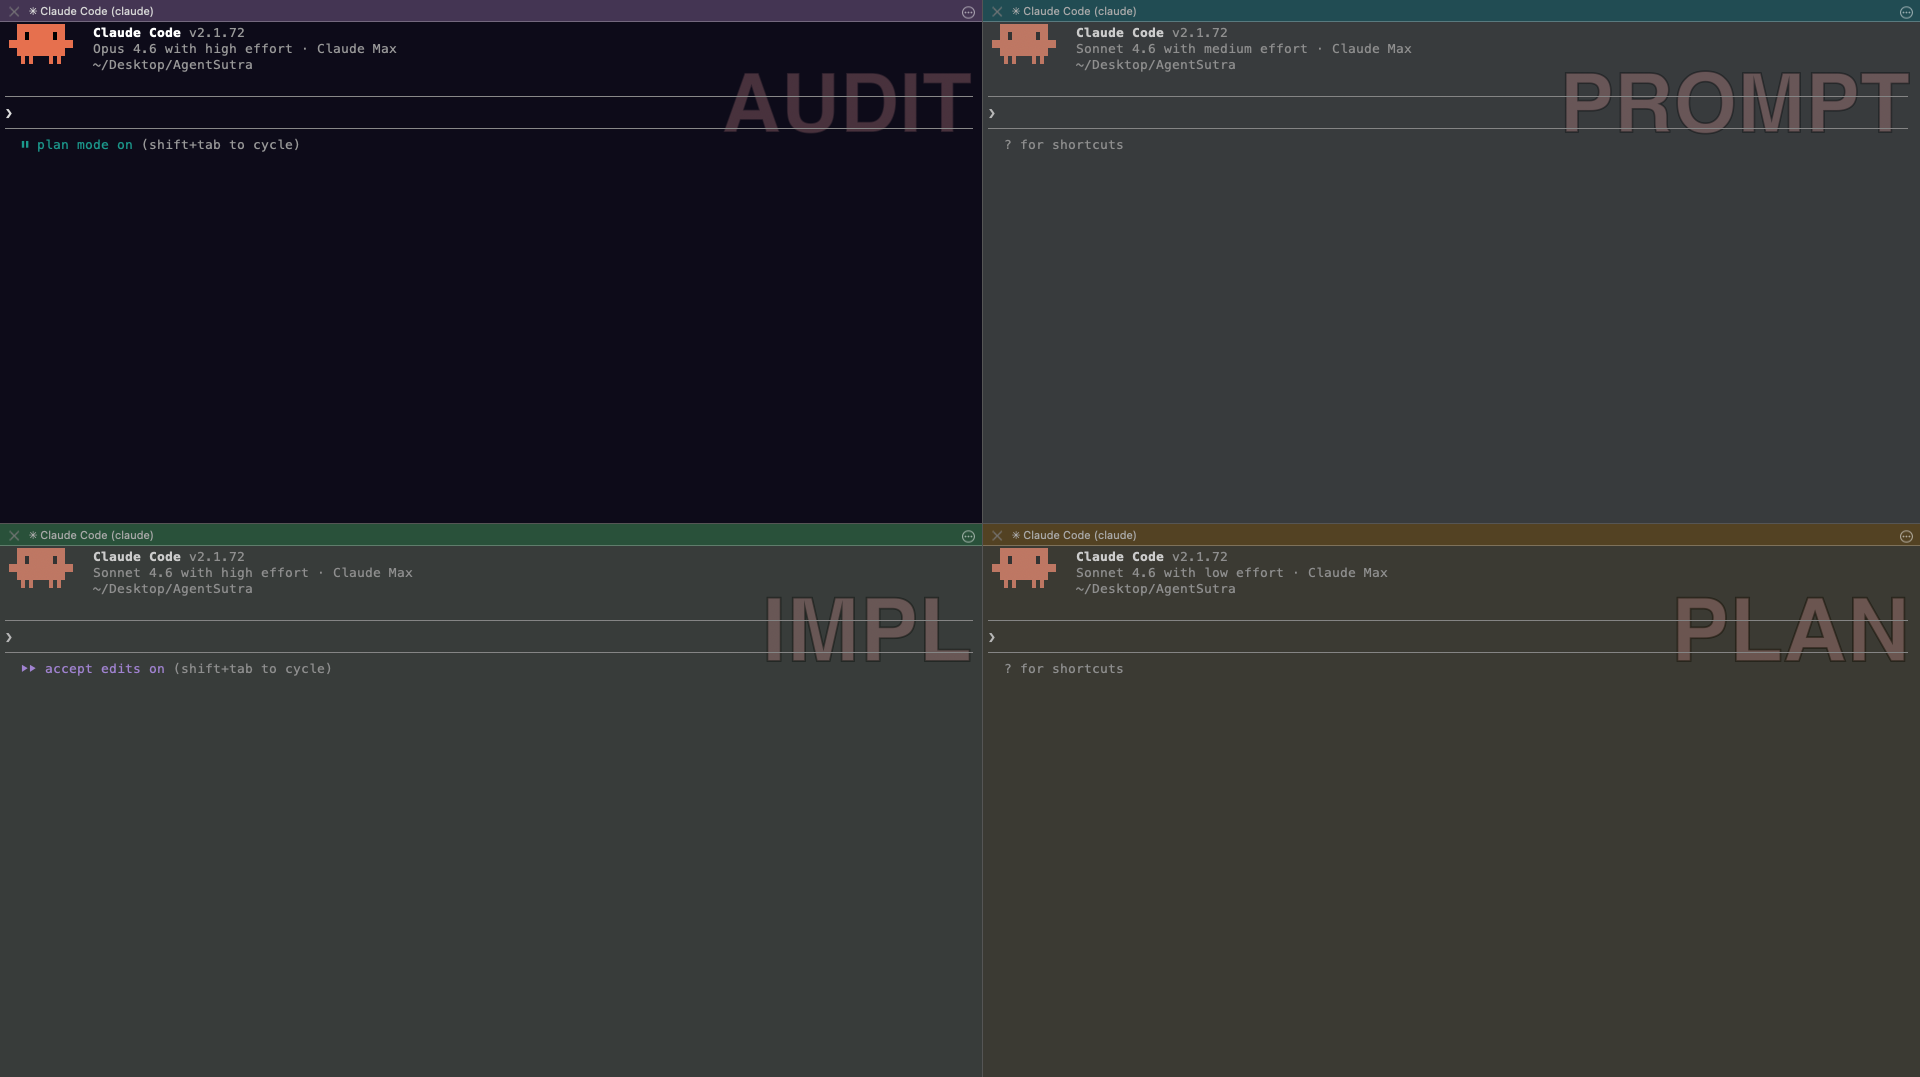
Create 4 named profiles, each with a distinct background tint, tab colour, and badge so you can instantly tell which pane you're in.
Each pane runs a separate Claude Code session with a dedicated role. The AUDIT pane uses Opus for deep review. Everything else uses Sonnet to keep costs down. A cc alias launches the right configuration automatically.
Open iTerm2 → Settings → Profiles (⌘,). Click the + button four times. Double-click each "New Profile" name to rename it:
| Profile Name | Background | Tab Colour | Role |
|---|---|---|---|
| CC-AUDIT | #0d0b18 | #a855f7 | Code review |
| CC-IMPL | #080f0b | #22c55e | Implementation |
| CC-PROMPT | #080e10 | #06b6d4 | Prompt engineering |
| CC-PLAN | #0d0b00 | #f59e0b | Architecture & planning |
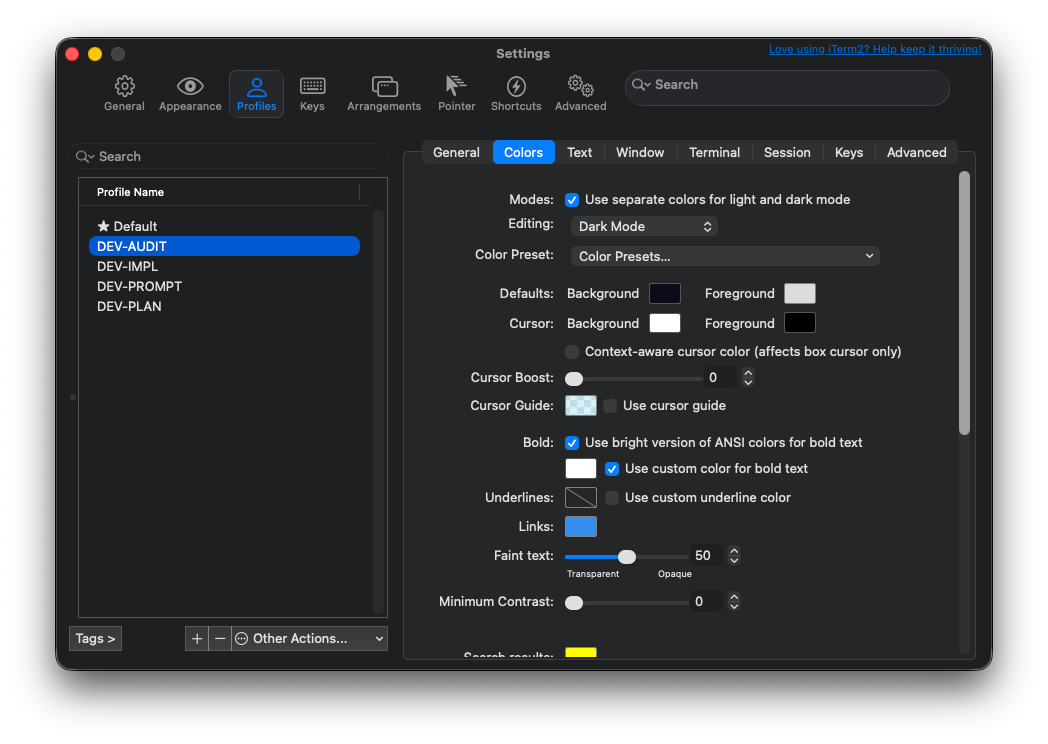
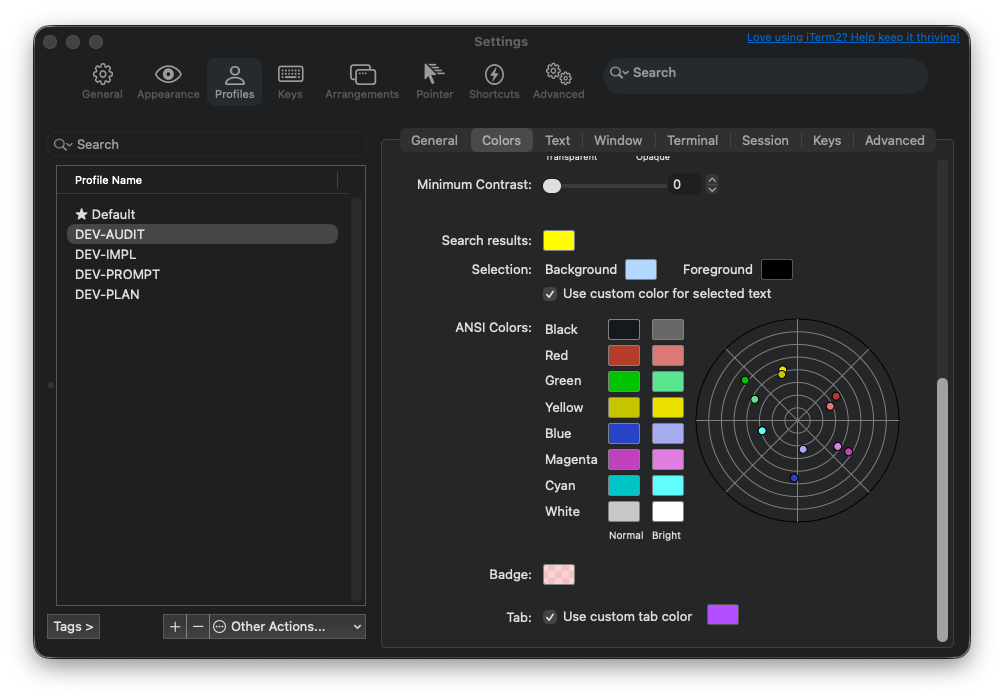
For each profile, click the Colors sub-tab:
- Click the Background swatch in the "Defaults" row. In the macOS colour picker, switch to Hex mode (sliders icon → dropdown at bottom) and enter the hex value from the table above.
- Scroll down to "Tab:", tick "Use custom tab color", and set the accent colour.
Click the General sub-tab for each profile:
- Title: Click the dropdown. Under "Foreground Job", uncheck "Job Name" (leave only "Session Name" checked under "Name"). This prevents the tab title from showing -zsh or (claude) after the role name.
- Badge: Type the role name (AUDIT, IMPL, PROMPT, or PLAN). This overlays a faint watermark on the pane background.
Then click the Text sub-tab and set font to JetBrains Mono 13pt (or Menlo 13pt).

Profile Startup Commands & Initial Directory
Each profile needs a startup command (to cd into the project directory and open an interactive shell) and an initial directory setting (as a fallback for window arrangement restores).
In each profile → General sub-tab → change the Command dropdown from "Login Shell" to "Custom Shell" and paste the corresponding command:
Replace your-project with your actual project directory name.
exec zsh at the end? It replaces the subshell with an interactive zsh session. Without it, the pane would close the moment you exit Claude Code or any other command.Still in the General sub-tab, find Initial directory below the Command field. Change from "Home directory" to "Directory:" and enter the full path:
Shell Snippet
Add a block to your ~/.zshrc that auto-detects which profile you're in and configures coloured prompts, locked tab titles, and a cc alias to launch Claude Code with the right flags.
Open your shell config file and paste this block at the very bottom:
Then run source ~/.zshrc in each pane to apply.
- $ITERM_PROFILE is set automatically by iTerm2 on every session — including arrangement restores. No dependency on startup commands.
- precmd_functions+=() adds to the hook array rather than overwriting it, so existing hooks from pyenv, fnm, conda, etc. are preserved.
- Normal terminals (Default profile) are completely unaffected.
Window Layout & Arrangement
Create a 2×2 pane layout, save it, and configure iTerm2 to restore it automatically on launch.
- Open a new window with the CC-AUDIT profile.
- ⌘D — split right. Right-click the new pane → Edit Session → change profile to CC-PROMPT.
- Click back on the left pane (AUDIT). ⌘⇧D — split down. Change the new pane to CC-IMPL.
- Click on the top-right pane (PROMPT). ⌘⇧D — split down. Change the new pane to CC-PLAN.
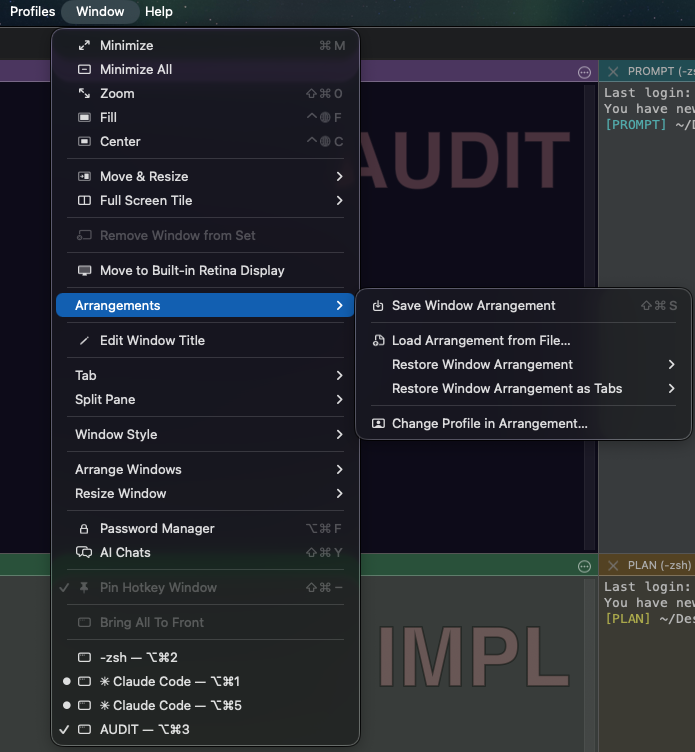
- Window → Arrangements → Save Window Arrangement — give it a name (e.g. your project name).
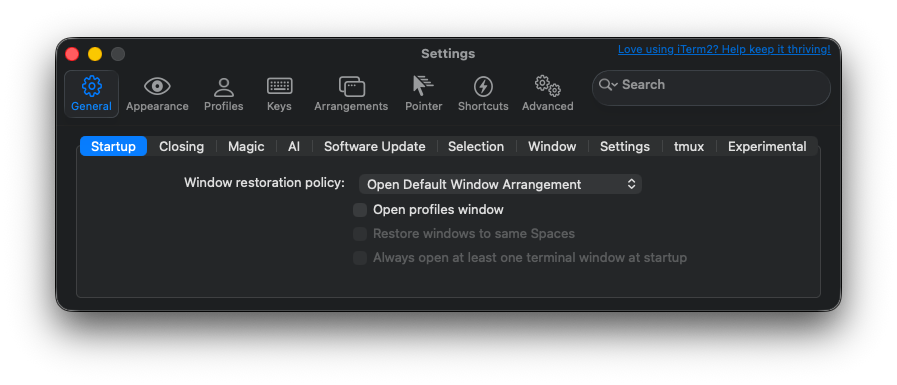
- Go to iTerm2 → Settings → General → Startup and set "Window restoration policy" to "Open Default Window Arrangement".
- Back in the menu: Window → Arrangements → Save Window Arrangement once more — this saves it as the default arrangement that the startup policy will use.
Launch Claude Code
Type cc in any pane. The alias you set up in Step 4 launches Claude Code with the correct model, effort level, and permissions for that pane.
| Pane | cc expands to | What you see |
|---|---|---|
| AUDIT | claude --model opus --effort high --permission-mode plan | Opus · plan mode on |
| IMPL | claude --model sonnet --effort high --permission-mode acceptEdits | Sonnet · accept edits on |
| PROMPT | claude --model sonnet --effort medium | Sonnet · medium effort |
| PLAN | claude --model sonnet --effort low | Sonnet · low effort |
Note: On some systems, cc is aliased to the C compiler. If you work with C/C++, rename the alias to cl or claude-go in your ~/.zshrc.
| Flag | Purpose |
|---|---|
| --model opus|sonnet|haiku | Model selection (or full IDs like claude-opus-4-6) |
| --effort low|medium|high|max | Thinking budget: low = fast, minimal reasoning; medium = balanced; high = extended reasoning chains, more tokens; max = maximum depth (slowest, most expensive). PLAN uses low — architectural discussion doesn't need deep reasoning chains. |
| --permission-mode plan | Read-only — Claude cannot write files |
| --permission-mode acceptEdits | Auto-accept file edits without prompting |
| --append-system-prompt "..." | Add custom instructions on top of defaults |
| --continue | Resume most recent conversation in this directory |
| --resume | Resume a specific session by ID |
Keyboard Shortcuts
iTerm2 navigation
Claude Code (inside a session)
iTerm2 Triggers (Optional)
Auto-highlight keywords in terminal output.
Set up in Profile → Advanced → Triggers → +
| Regex | Action | Colour |
|---|---|---|
| \b(CRITICAL|ERROR|FAIL(ED)?)\b | Highlight Text | Red background |
| \b(PASS(ED)?|SUCCESS)\b | Highlight Text | Green background |
| \b(WARNING|WARN|TODO)\b | Highlight Text | Yellow background |
Cross-Pane Workflow
Every code change follows this pattern across panes:
When AUDIT finds an issue, copy its output and paste into IMPL:
- Re-anchor on long sessions: "Re-read CLAUDE.md and confirm the project rules. Then..."
- Scope AUDIT reviews: "Focus ONLY on src/auth.py. Do not read any other files."
- Clear stale context: /clear resets the conversation entirely.
- Compress instead: /compact summarises and frees context without losing history.
- State sync before review: Run /clear in the AUDIT pane before starting a review pass on code that IMPL just wrote. This ensures AUDIT reads current file contents, not stale versions cached in its context.
Daily Playbook
Adapt for Other Projects
This setup is project-agnostic. To use it with a different codebase:
Use a project-specific prefix: MYPROJECT-AUDIT, MYPROJECT-IMPL, etc. Or keep DEV-* and just change the directory.
Point to the new project path in each profile's General tab.
Add matching entries in both case blocks for the new names:
Name it after the project (Window → Arrangements → Save Window Arrangement). To switch between projects later, use Window → Arrangements → [arrangement name] — iTerm2 opens the saved 4-pane layout for that project in a new window.
Two-Tier Hook Architecture
Hook scripts enforce safety invariants that prompt instructions alone cannot guarantee — blocking dangerous tool calls before they execute and tripping a circuit-breaker on repeated failures.
Open (or create) ~/.claude/settings.json. Copy the "hooks" block from hooks/settings.json.example into the top level of the JSON object. All "command" values use $HOME — Claude Code does not expand ~.
$HOME instead of ~? Claude Code does not expand ~ in hook command strings. Use $HOME which the shell expands at execution time, or replace with your full absolute path.The example also includes "env": {"CLAUDE_AUTOCOMPACT_PCT_OVERRIDE": "50"}. This tells Claude Code to auto-compact the conversation context when it reaches 50% of the context window. Without this, Claude waits until near the limit before compacting, which can cause abrupt context loss mid-session. Set to "0" to disable, or remove the "env" block entirely to use the default threshold.
| Hook | Tier | Blocks when |
|---|---|---|
| protect-env.py | PreToolUse | Edit/Write/MultiEdit targets any .env file |
| protect-git-push.py | PreToolUse | Bash command matches git … push |
| circuit-breaker.py | PostToolUse | 3 consecutive tool failures |
| session-start-reset.py | SessionStart | (resets counter — never blocks) |
| version-check.py | SessionStart | (never blocks — prints update checklist when Claude Code version changes) |
gate Workflow
Two aliases in the IMPL pane create a hard gate between implementation and review.
Both aliases are only defined when $ITERM_PROFILE == CC-IMPL. They are no-ops in other panes.
Never send work to AUDIT until gate passes.
SESSION_LOG Pattern
Without a session log, each IMPL session starts cold — Claude asks for a project overview instead of resuming from where work stopped.
Append a new entry at the end of every session. Never overwrite old entries. Minimum viable format:
Real example:
In your ~/.claude/CLAUDE.md (see Step 14), add a Session Continuity instruction: "At the start of every session, read the last 60 lines of SESSION_LOG.md and surface the most recent 'Next:' items before doing anything else."
CLAUDE.md Split Pattern
Separating global rules from project-specific rules reduces noise and prevents cross-project contamination in every Claude session.
| File | Location | Committed? | Contains |
|---|---|---|---|
| CLAUDE.md | ~/.claude/ | No — personal | Coding conventions, error-handling policy, tool preferences |
| CLAUDE.md | .claude/ (repo) | Yes | Project architecture, active constraints, session continuity |
Claude Code merges both automatically — global first, project-specific second.
MCP Server, Slash Commands & Skills
Phase 6 additions — GitHub MCP integration, the /reflect command, and contextual skills.
Claude Code registers MCP servers via claude mcp add, not by reading a config file from disk. The included .mcp.json.example is reference JSON if you need claude mcp add-json instead.
- Install the binary:
Or see github.com/github/github-mcp-server for other install methods.brew install github-mcp-server
- Register with Claude Code (user-scope — available in every project):
Generate a read-only PAT at github.com/settings/tokens with scope public_repo (or repo for private-repo access). Recommended expiry: 90 days.claude mcp add github -s user \-e GITHUB_PERSONAL_ACCESS_TOKEN=ghp_your_readonly_token \-- $(which github-mcp-server) stdio
- Verify: claude mcp list | grep github
Run /reflect at the end of any IMPL or AUDIT session. Claude reads the recent git log and diff, then outputs a formatted table of suggested CLAUDE.md additions — ready to copy and paste.
Three skills that load relevant instructions automatically when Claude is doing review or test work:
| Skill | Pane | Adds |
|---|---|---|
| code-review | AUDIT | Project-specific review conventions |
| security-audit | AUDIT | Security checklist and vulnerability patterns |
| testing | IMPL | pytest conventions matching the project |
Skills activate automatically — no manual invocation needed.
Draw Things (Optional — Creative AI)
Free local image generation on macOS. Runs entirely on-device via Core ML — no API calls, no sign-up. Completely independent from Claude Code and Ollama.
- Download from the Mac App Store: search “Draw Things AI Image Generator”.
- Open the app and let it download a base model (~2–4 GB).
- Prompt directly in the app’s text field. Drag and drop an image as reference.
Recommended starting model: SDXL Turbo (fast) or Flux Schnell (higher quality). Models are downloaded in-app — no terminal commands needed.
Troubleshooting
Common failure modes and how to fix them.
Symptom: echo $ITERM_PROFILE returns nothing. The cc alias falls through with no model flags.
Cause: Old iTerm2 version (< 3.3) or the pane was opened before the profile was applied.
Fix:
- Update iTerm2 to 3.3 or later (Help → Check For Updates).
- Close and reopen the pane by selecting the profile explicitly: Profiles → [your profile name] → Open in current tab.
- Confirm with: echo $ITERM_PROFILE — should print CC-AUDIT, etc.
Symptom: which cc shows /usr/bin/cc. Typing cc outputs compiler error messages.
Fix: Rename the alias in ~/.zshrc. Replace all 4 alias cc= occurrences with alias cl= (or any name you prefer), then reload:
Check 1 — Hook files exist:
Check 2 — Python 3 is available:
Check 3 — settings.json is valid JSON:
Symptom: Claude is blocked and won't proceed. The circuit-breaker tripped after 3 consecutive tool failures.
Fix A — Start a new session: Press Ctrl+C, then type cc. The session-start-reset.py hook fires automatically on session start and resets the counter.
Fix B — Reset the state file directly:
Symptom: gate exits non-zero immediately or pytest reports collected 0 items.
- Venv not active: Run source venv/bin/activate (or source .venv/bin/activate) before running gate.
- pytest not installed: which pytest should point inside your venv. If not: pip install pytest.
- No test files yet: Add a placeholder so the intent is explicit: touch tests/test_placeholder.py with a single passing test.
The protect-git-push.py hook blocks Claude from running git push autonomously. You can always push directly from a regular terminal prompt — hooks only intercept tool calls inside a Claude Code session.
Symptom: After npm update -g @anthropic-ai/claude-code, typing cc errors with an unknown flag message.
- Run claude --help to see current supported flags.
- Update the alias block in ~/.zshrc to match, then source ~/.zshrc.
- Most stable flags: --model and --effort have been stable across versions. --permission-mode values are also stable. Check the Claude Code release notes for breaking changes.
Run claude --version to check your installed version. This guide was verified against v2.1.81 (March 2026).
Quick Reference — read as needed
Everything on one screen — copy, paste, go.
| Pane | Model | Effort | Permission | Purpose |
|---|---|---|---|---|
| AUDIT | Opus | high | plan | Code review (read-only) |
| IMPL | Sonnet | high | acceptEdits | Write code + run tests |
| PROMPT | Sonnet | medium | default | Prompt engineering |
| PLAN | Sonnet | low | default | Architecture + planning |
| Alias | Pane | What it does |
|---|---|---|
| cc | All | Launch Claude Code with role-correct flags |
| gate | IMPL | Run full test suite — must pass before AUDIT handoff |
| ship | IMPL | gate + git add -p + git commit |
| Shortcut | Action |
|---|---|
| ⌘⌥ ←/→/↑/↓ | Switch panes |
| ⌘⇧↵ | Zoom/unzoom pane |
| ⌘D | Split right |
| ⌘⇧D | Split down |
| Esc | Stop Claude generation |
| /clear | Reset conversation context |
| /compact | Compress context (keep history) |
| Hook | Event | Blocks |
|---|---|---|
| protect-env.py | PreToolUse | Any edit to .env files |
| protect-git-push.py | PreToolUse | git push commands |
| circuit-breaker.py | PostToolUse | 3 consecutive tool failures |
| session-start-reset.py | SessionStart | (resets counter) |
| version-check.py | SessionStart | (never blocks — prints update checklist on version change) |